Blaster Basics: Choosing Paints
June 16, 2016Many of us Nerf enthusiasts love painting our blasters. We baby them, we give them TLC, we want to make them our own. It’s this little addition of flair that goes so far sometimes in making that first impression all the better. For many, that flair is a sense of realism or even a “post-apocalyptic” feel. For others, such as myself, the realm of whimsical toys may be where you dwell. I am of the opinion that there’s really no wrong paint style once we put our personal preferences aside. However, the end result hinges on choosing the right paints for the job. Following is a brief guide to making “good” choices for your next blaster painting project.
This is not a “painting guide,” per se, but more of a “shopper’s guide.” As such, you’ll see a lot of brand names and paint types. These brands aren’t really as set in stone as some may have led you to believe. Think of them more as “strong recommendations” more than requirements, except maybe when you’re going for specific colors. What’s important to get out of this is when to use which paint type and how best to apply it to your end goal. I will go application-by-application, but don’t be afraid to ask me (“DerpMods”) directly or in the comments section below if you have a question you don’t see answered here.
Realism can be a dirty word when it comes to toy blasters. “Orange tip” laws aside, a lot of the hobby stays away from it to avoid the association with firearms. Supposing you don’t, you should take the time to make sure your black, “realistic” blaster has some character. For this reason, just one shade or texture of black is not enough. Yes, there is more than one shade of black–even more than one texture–and it can make all the difference. My recommendation is to carefully study the item you’re trying to mimic, and you’ll soon notice these slight differences. For instance, a grip may have more of a textured, satin-like finish. I recommend a nice black Satin spray, either from Krylon or Rustoleum, or perhaps even a rubberizing agent like Plasti-Dip or Rustoleum LeakSeal. The former accepts a finish like clear-coat or a lacquer more easily, and is good for cosplay or display, and the latter is far more sturdy for actual play and extended handling.
If you’re going on the cheap and don’t want to use powder finishes on plastic (trust me, it’s a pain), try applying black Semi-Gloss instead of matte for your metal. Yes, it’s going to dry a bit “shiny,” but we’ll address this in just a moment with our clear coat. I find that semi-gloss paint (or even satin) has a far smoother texture when dried in my local climate, so it makes the blaster both look and feel less “homemade” in the end.
Tactical rails can be tricky if they’re not pre-colored, especially since you may want to add accessories but don’t want the colors to rub off. I would suggest using a vinyl dye if you intend to use the rails frequently. It’ll adhere to the material a touch better than paint, and if it goes on well (results may vary), the texture should be quite smooth. Likewise, it’s highly unlikely that scratching up your rails with accessories will harm said dye, since it’s more or less bonded with your materials rather than merely sitting atop them.
Metal is a tricky thing, as so many people go for a “steel” or “brushed steel” paint right away, only to be disappointed when it dries “too dark.” If this has happened to you, try Rustoleum’s metallic Aluminum spray instead. I’ve had great results with it. It also takes to washes quite well, allowing you to give it a “grimy” look without much effort.
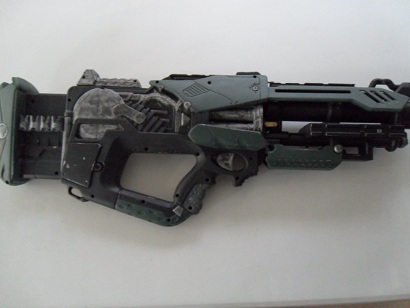
Once all is said and done, you should protect your paint job with a nice Satin clear-coat to give it a smooth, not-too-shiny finish. Stay away from semi-gloss and gloss, as they’ll be too shiny (and again, I find that matte both looks and feels awful). Follow these tips, and I think you’ll be happy with the results. That’s what I did with my “DM-24 heavy blaster,” seen below, and I am very happy with the results. It’s not all black and uses a few techniques we haven’t covered here, but it gives you an idea as to how “realistic” these paints can get.
“But what about toy-looking blasters?”, you may ask. “I don’t want realism. I want a whimsical look!” Don’t worry, I’ve got you covered. When you’re going for something toy-like and fanciful, you’re playing more with colors and textures than you are with shades and finishes – at least most of the time. For this reason, you’re given a bit more room to “play around” with techniques, and you shouldn’t be afraid to try new things. Some of my favorite paint jobs came about from when I was simply messing about, wondering how cre– Wait, is that an Elite-painted Vulcan over there?!
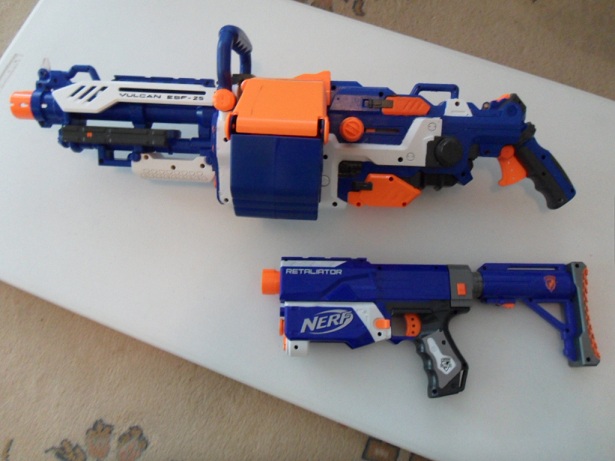
Why, yes. Yes it is! While I won’t lie and say my brush work is the best in the world, I’m very happy with how this came out. It’s also a great example of how we can play with colors and textures to create something that looks like Hasbro put it out themselves (or should have, *cough* *cough*). For such an application, I played with a lot of different paints before I found ones I liked, so don’t feel bad if you have to experiment a bit, as well. For my own purposes, I came up with this “master” formula:
- Rustoleum Painter’s Touch 2X White Flat spray, both for primer and for most of the exposed white you see. This helps the colors you put on top of it really “pop” as opposed to a duller white primer, and it gives us a nice brilliant white to apply clear coat over–again, letting us play with texture.
- The blue is another Rustoleum product: Deep Blue Gloss. I played around with a lot of other blues before settling on this one for all of my “Elite” painting. To my eyes, it looks the closest. Not quite spot-on, but good enough when you don’t want a custom batch made at your local paint shops.
- Our black “is black is black,” but for my purposes I hand-painted the Vulcan’s lettering with Citadel’s Abbadon Black. You don’t really need a specific black to match Hasbro’s shade. It’s pretty forgiving. I just had the Citadel paints sitting around.
- Again, you may find dark grey “is dark grey is dark grey,” but the darker accents and rails you see on mine were hand-painted with Citadel’s Skavenblight Dinge. It dries pretty close to the Elite, so I’m quite happy with it.
- Orange, on the other hand, turned out to be very specific. I tried many products from several brands before I finally “settled” on yet another Citadel product. There really wasn’t much orange painting to do, save an accent here or there, and for those I slapped on some Troll Slayer Orange. One word of warning: since it is a Layer paint, it’s a touch runny and imprecise compared to their Bases. Still, it turned out nicely enough.
The key lessons to take away from this formula are pretty straight-forward. Start with a base/priming coat that is much lighter than all the other colors you’ll be using (can’t go wrong with white). For a toy-like look, stay away from mattes and satins as your primary coats, and go for the sleeker and shinier semi-gloss and gloss paints. Don’t be afraid to get in there and hand-paint with some acrylics, as this will only add more visual “pop” with your textures. When everything else is done, I finish mine off with Gloss clear-coat, and it makes for a nice, shiny “plastic” look, which is exactly what we want here.
In summary, while techniques can vary, I feel it’s more a matter of paint choice that makes or breaks your paint job. I hope my ramblings here are helpful when it comes time to decide how to proceed. Just remember the most important points… an “all black” paint job is never just one shade. You should have lots of different shades of black in there, achieved by using different product brands and types. This will give it more character and eye appeal. Whimsical or toy-like blasters need even more character, so textures are crucial in making this happen. And don’t be afraid to play around with different products, and different finishes for each. If you follow these tips and put a little bit of planning into your paint jobs, I think both you and those around you will begin to take notice!